Make your own bug hotel
In this article, WellChild's Helping Hands team takes us through a step-by-step guide on how to make two types of bug hotels.
Insects play a crucial role in maintaining the health and balance of our gardens and environment. From pollination to pest control, these tiny creatures are indispensable allies. They attract a variety of other animals such as birds, mice, hedgehogs, bats, and even slowworms. If you love wildlife and want to help your local ecosystem, then here are a few ways you can attract insects to your own garden:
- Plant a variety of flowers
- Provide water source(s)
- Avoid pesticides
- Plant herbs
- Add compost and mulch to enrich the soil
- Educate yourself and others
- Build an insect sanctuary
Learning about insects and bugs can be very interesting, regardless of age, and creating an insect house, hotel or entire city can provide hours of fun for children and adults alike.
So, how do you go about doing just that? Well, the answer is much simpler than you’d imagine and doesn’t even have to cost you any money.
This article will cover how to build two styles of insect hotels. First we will look at the quick and easy Wooden Pallet Insect Hotel. Then, we will give you a step-by-step guide for a Timber Bug Hotel. By the end of this article you’ll have all the information you need to set you off on your own journey to building an insect hotel and/or city!
What is an insect sanctuary?
Any insect sanctuary is just a place where bugs and insects can live in a secure, dry and inviting environment. Gaps and holes play a pivotal role in helping create such conditions and the use of natural materials not only allows for insects to thrive, but they also encourage insects and bugs to enter in the first place. You also need to think about where you want to place your finished piece because some bugs like shade whilst others love sunny spots.
What materials do I need?
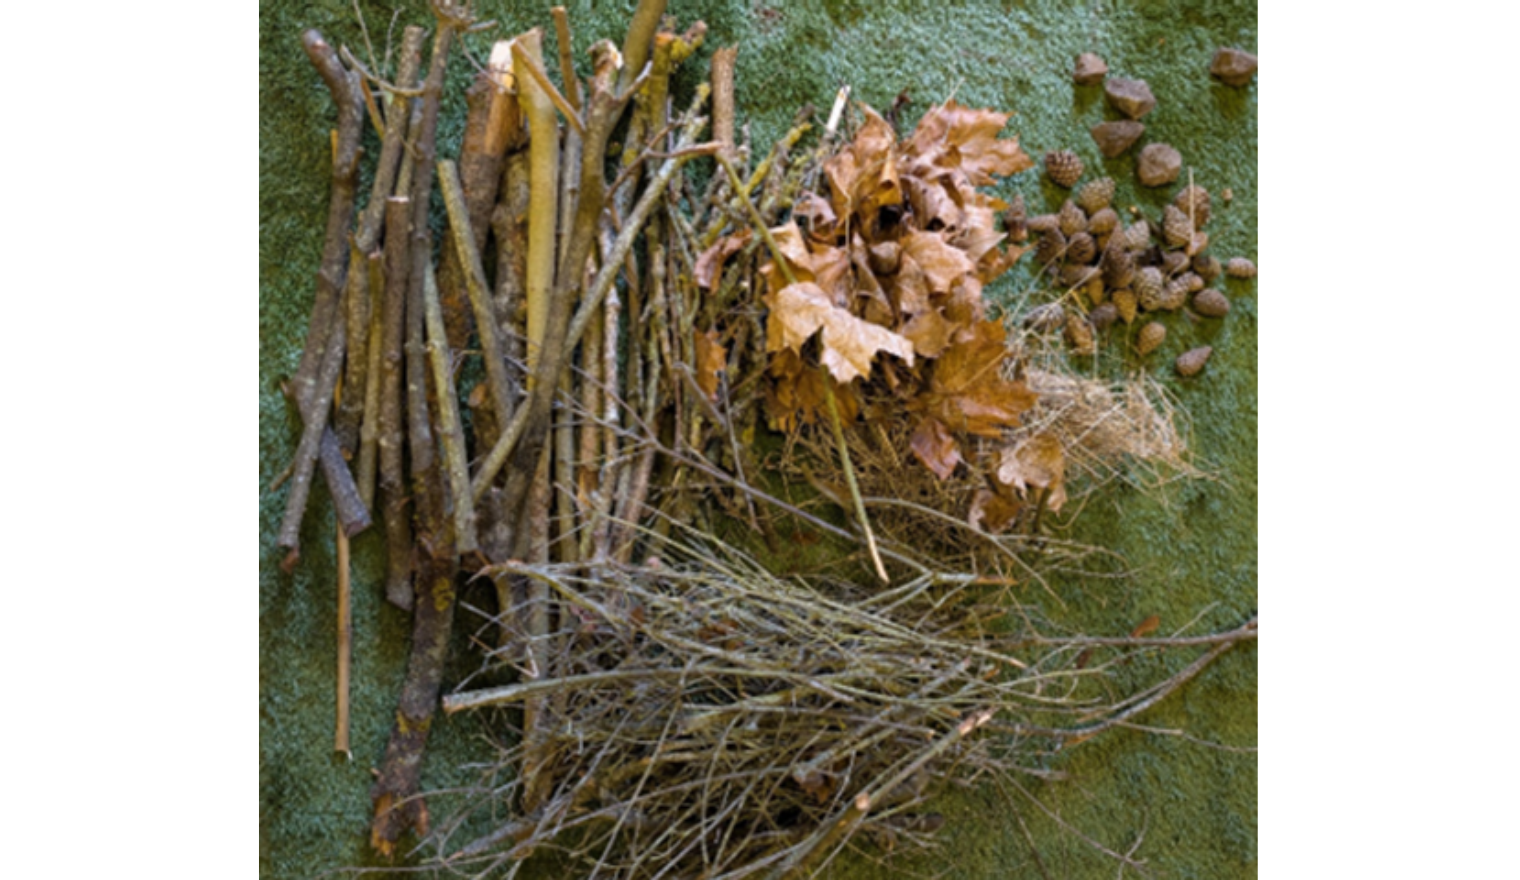
Below is a basic list of materials you can use for any design of an insect house. If you use a variety of these, then you’ll attract numerous types of insects and bugs, including ladybirds, spiders, beetles, woodlice, lacewings, and solitary bees.
- Dry leaves
- Dead grass/hay/straw
- Bark
- Twigs and logs
- Pinecones
- Moss
- Old turf
- Canes & bamboo
- Old timber cutoffs
- Cardboard
- Plant pots (whole or pieces)
- Bricks (whole or pieces)
- Rubble/slate/rocks/large pebbles and stones
- Pipes (plastic and ceramic)
- Old cups, plates, dishes
- Glass bottles
Gathering these materials can be a fun activity! I went on a dog walk to my local park and spent an hour collecting dry leaves, pinecones, twigs and fallen branches so I could add them to my design.
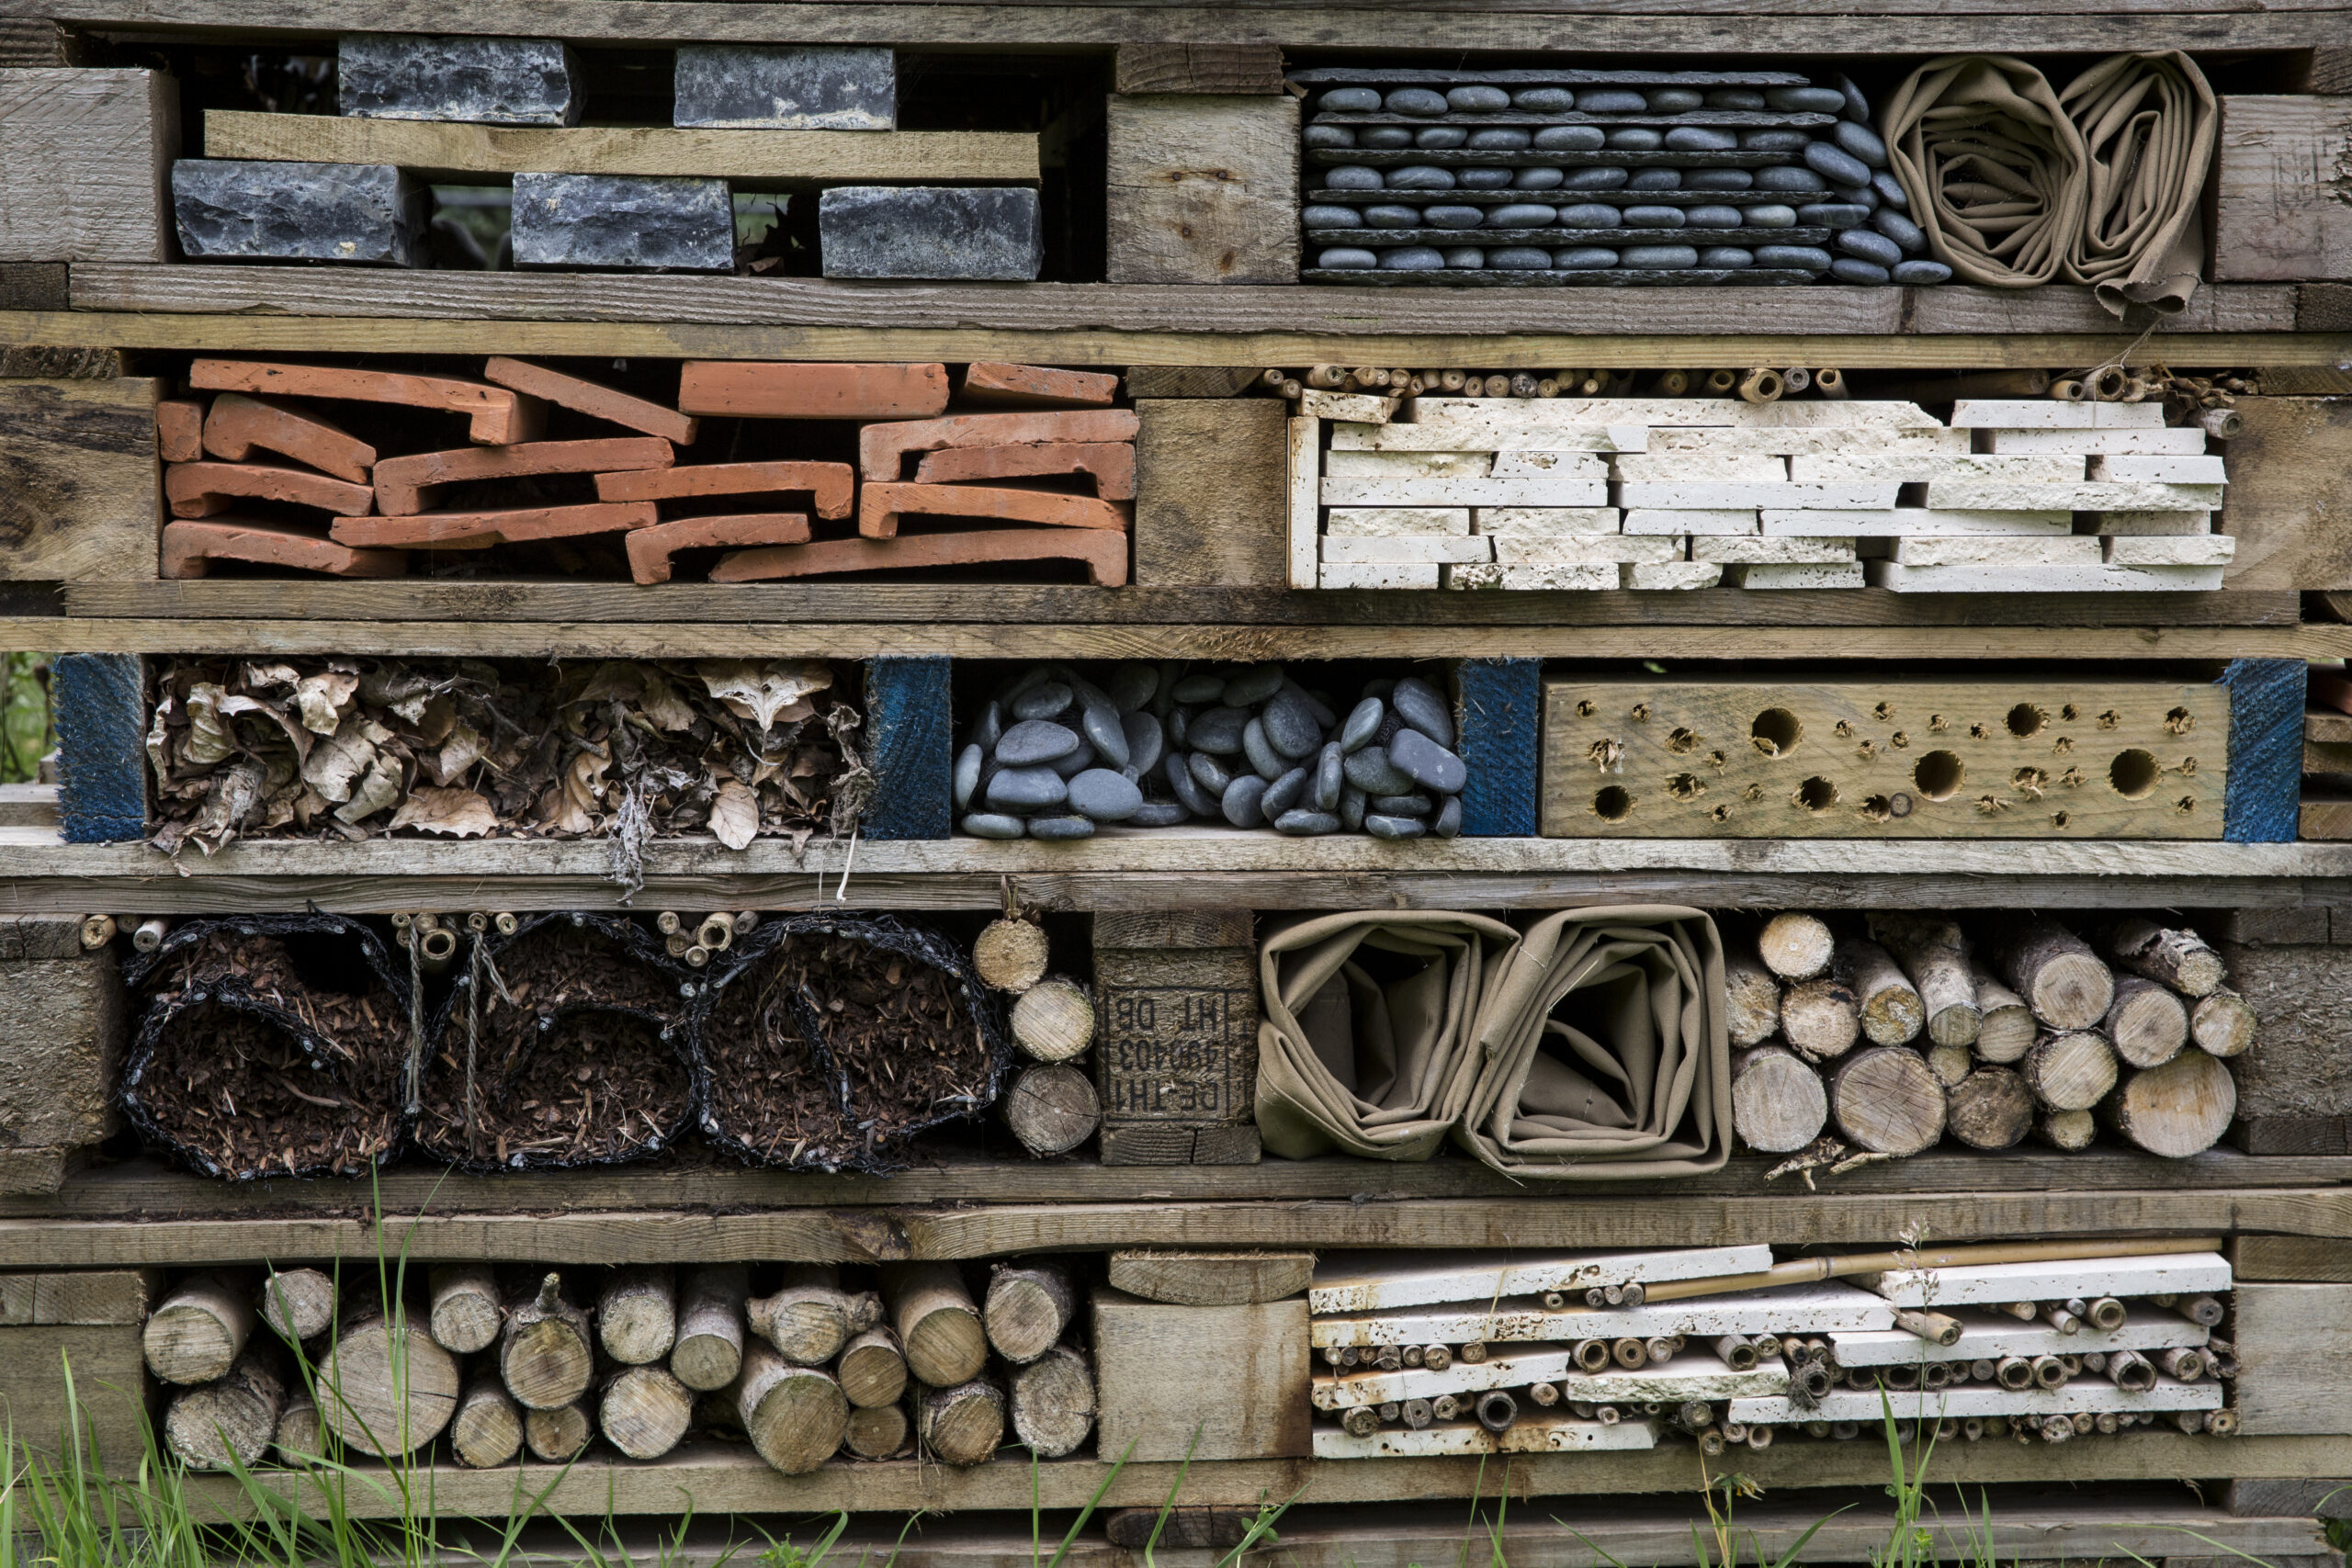
Wooden Pallet Insect Hotel
One of the best ideas for an insect hotel is simply using old wooden pallets and securely stacking them on top of each other. Pallets are great for loads of reasons, including:
- They are easy to find.
- They are free.
- They take a long time to rot through.
- They naturally provide the space required to insert various materials suited for insect attraction.
- They’re also nice if you want to have a rustic appeal or have an area already dedicated to wildlife which you just let grow wild.
How do I build it?
1. Get your wooden pallets and stack them
Find some old wooden pallets and securely stack them on top of each other.
It is best not to stack higher than 1 metre (around 6-8 pallets). Even if you only have one pallet, that is a great start and you can then add more levels at later dates!
2. Fill with materials
Get your materials that you gathered earlier. Simply add them into the wooden pallets.
3. Create your roof
The most important point for pallets is trying to create a rain-resistant top or roof so that the sections below remain mostly dry, especially in the depths of winter. You could lay some old timber planks across the top, use slates, or even thick branches with moss placed in any gaps to reduce dripping.
When I previously constructed an insect hotel using pallets, I laid some branches and twigs across the top. Then I added some offcuts of turf on top of these – this worked perfectly and added a bit of extra colour to the structure.
Timber Insect Hotel
Building a timber insect hotel requires a little more construction, but with our step-by-step guide, it couldn’t be simpler!
1. Safety first!
It is essential to wear appropriate work gloves!
Goggles and a facemask could also be useful, but this is up to you.
2. Pick your design
Think about how you’d like your design to look – I always make a drawing on paper so I can visualise the finished piece and get an idea of how much timber and other materials are required.
Here’s my design and the three main stages of construction:

3. Get your tools and materials
To start building you will need:
- A drill and some various sized wooden drill pieces
- A handsaw
- An impact driver with a Pozi – PZ2 (Philips screwdriver) bit
- A pencil
- A carpenter’s square
- A variety of screw sizes. One of the cheapest ways to buy screws, in various sizes, is from B&Q’s pick ‘n’ mix option. A medium bag will be more than enough for this project and will set you back less than £6! The size of screws you need will depend on the thickness of the wood you use.
The general rule for choosing the correct length of the screw is that it should enter at least half of the attached wood’s thickness! Here are the sizes of screws I picked:
- 4 x 30mm
- 4.5 x 40mm
- 4.5 x 50mm
- 5 x 80mm
- 5 x 100mm
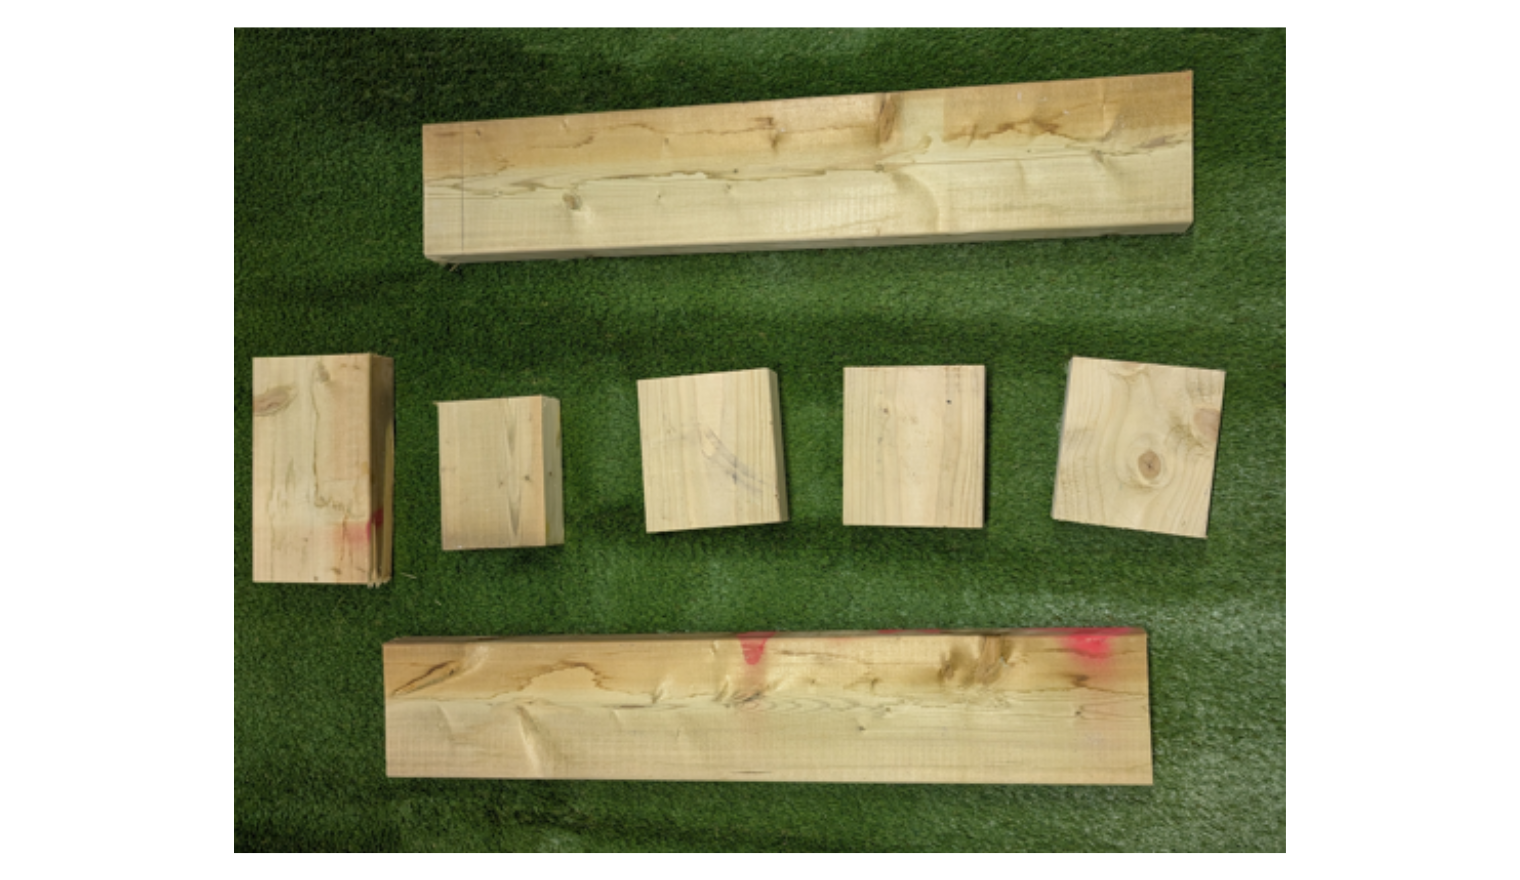
You will also need some timber!
You can use whatever size wood you have available. I had some spare 2”x6” (45mm x 150mm) pieces of treated timber which I used for the sides, shelves, and top of my hotel. I also used an offcut of 19mm hard plywood, which I reduced further to fit as the rear.
If you need to buy some, then a great choice for cost and ease of use is gravel board (150mm x 22mm). This is available at most DIY stores and comes in a variety of lengths.
You can’t really go wrong in however you decide to create your sanctuary. The main consideration is sturdiness for the insects and safety for children. Whatever size or material you use needs to be of solid construction, so it doesn’t blow over in windy conditions, nor get knocked over by interested children.
4. Prepare for cutting
Once you’ve planned the design of your bughouse on paper, it’s time to gather, measure, and cut the timber. Remember the age-old adage: “Measure twice, cut once!”
Also, make sure you use a suitable level surface for cutting on. If you aren’t completely confident, it’s always best to get an extra pair of hands to help you!
5. Connecting it all together
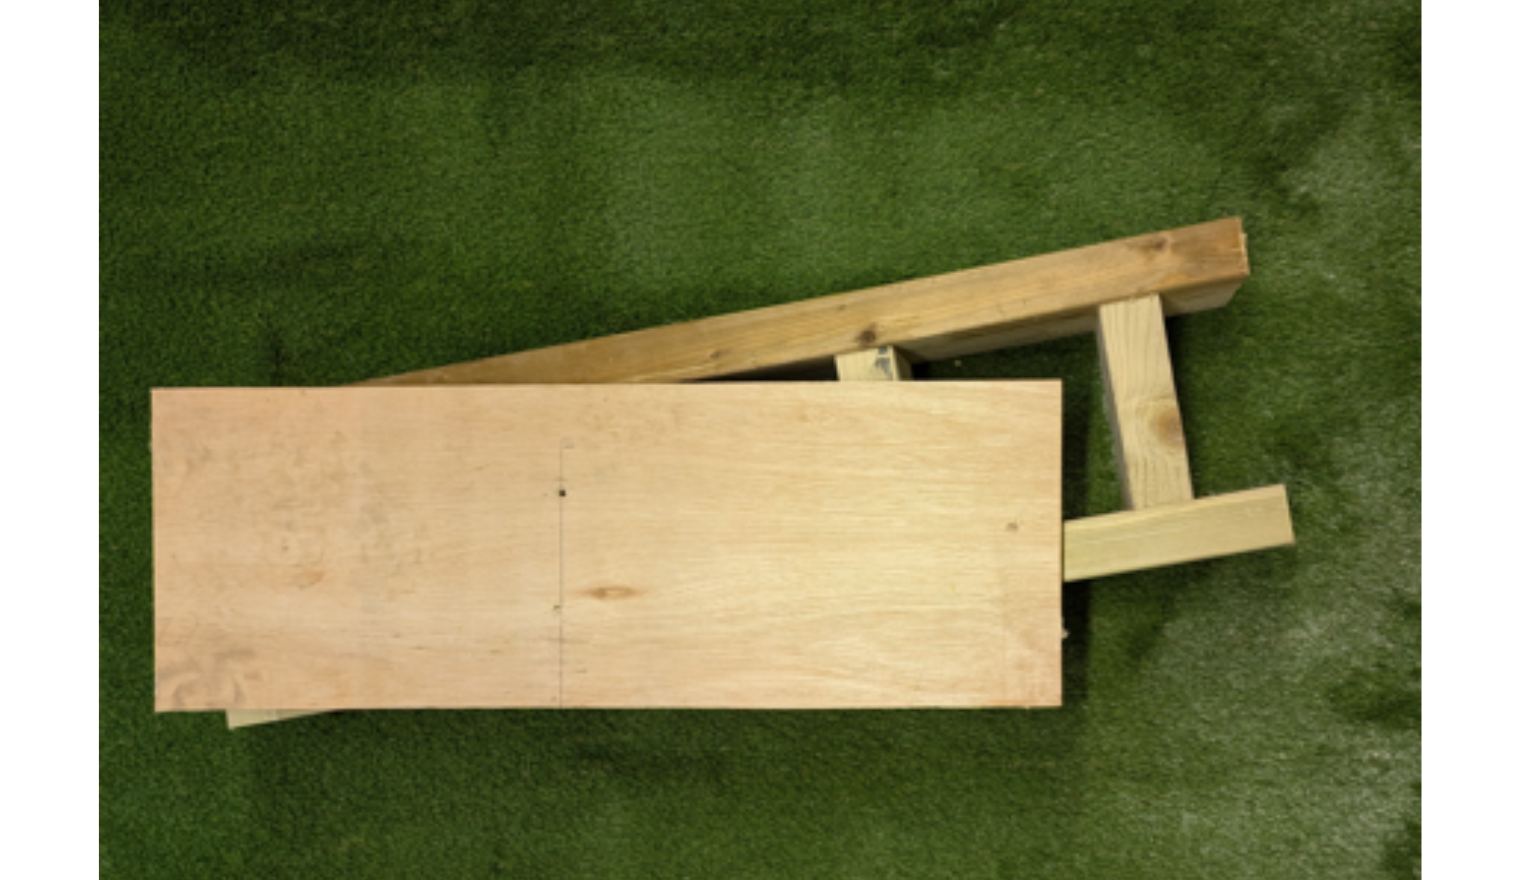
Once you’re sure you’ve cut all the pieces you need, the next step is simple: put them all as close together as possible in the exact positions you want, just like I have in the photo below. This way, you can double-check that you’ve cut all the pieces evenly and to the correct lengths, and that it’s all going to fit together how you imagined!
This step also gives you an opportunity to mark exactly where you want to insert your screws. Using a tape measure or ruler and a pencil, mark on both side pieces where the centre of each shelf will sit. You can also mark the top piece of wood in the same way. This way, you can be sure that your screws will be in the best position.
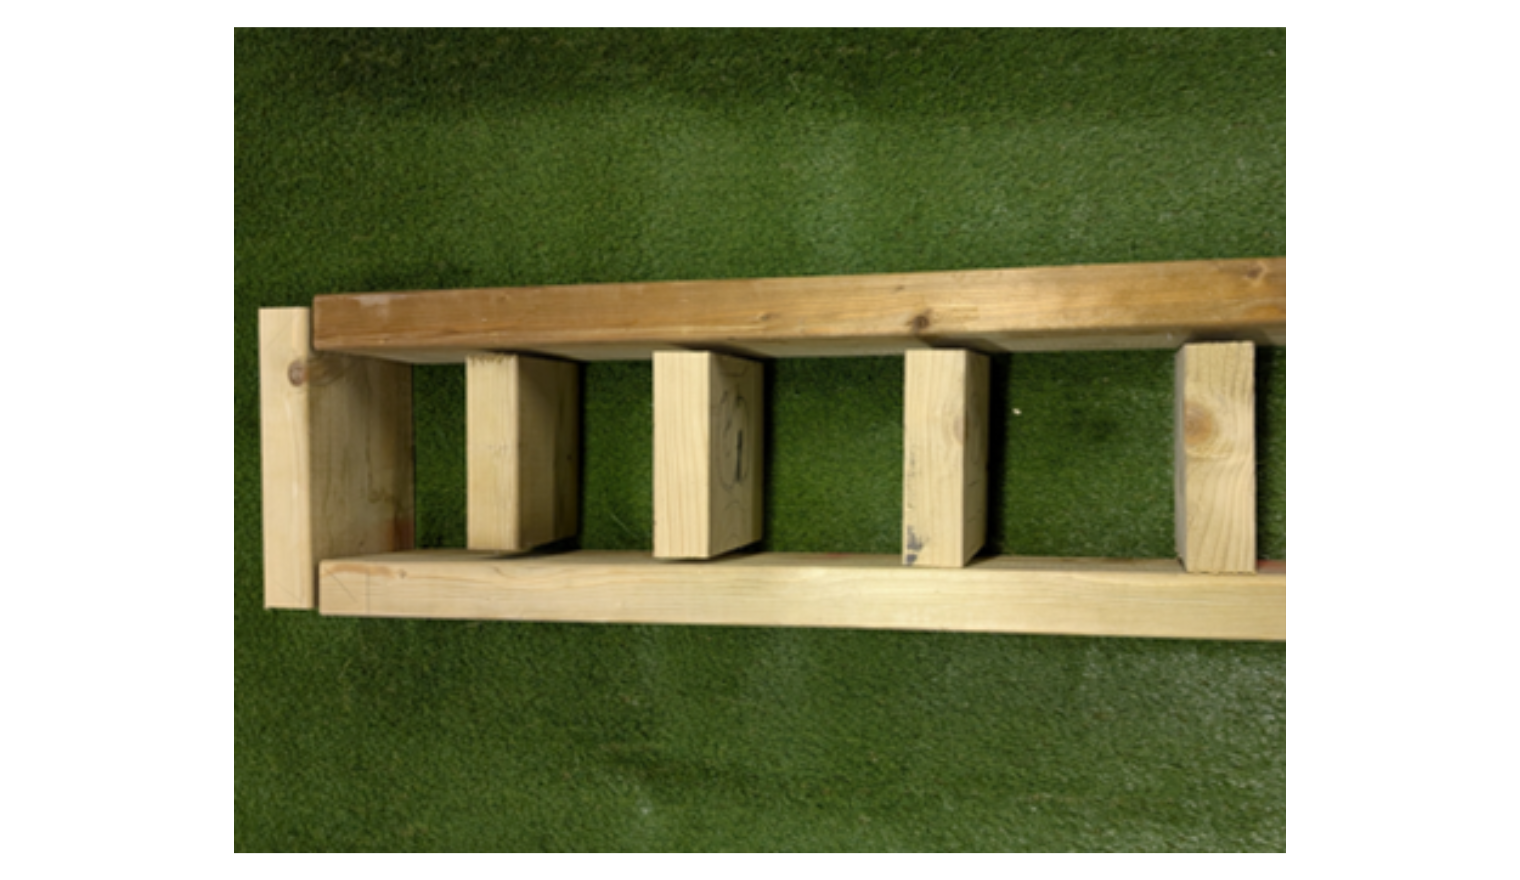
Alternatively, if you have a good eye, you can skip this step and advance straight on to inserting the screws and connecting all the pieces together. As with cutting, you may find it easier if you have a second pair of hands to help steady the wood whilst you do this.
To start, it’s always best to use a small drill bit suitable for wood to create pilot holes for the screws. Not only do these pilot holes help prevent the wood from splitting, but they also allow the screws to be held in position. You’ll find this will help you when you come to insert them with your impact driver or drill. Just make sure that the drill bit is at least 1-2 sizes smaller than the screws you’ll be using.
In the photo, I’m using 5x100mm screws. The “5” refers to the thickness of the screw in millimetres and the 100mm refers to the length. I therefore chose a 3mm drill bit to create the pilot holes.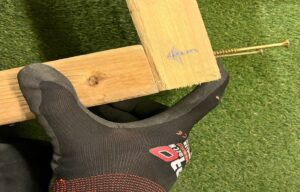
Make sure you use at least two screws for each timber join created!
In the photo, you can also see that I’ve marked a centre line, pre-drilled the pilot holes, and inserted two screws ready for screwing them down. Two screws on either side will create enough strength to hold most bughouses together.
6. Add the back of your bug hotel (optional)
If you want, you can add a rear to the back of your insect hotel. However, this is up to you and not vital for the construction.
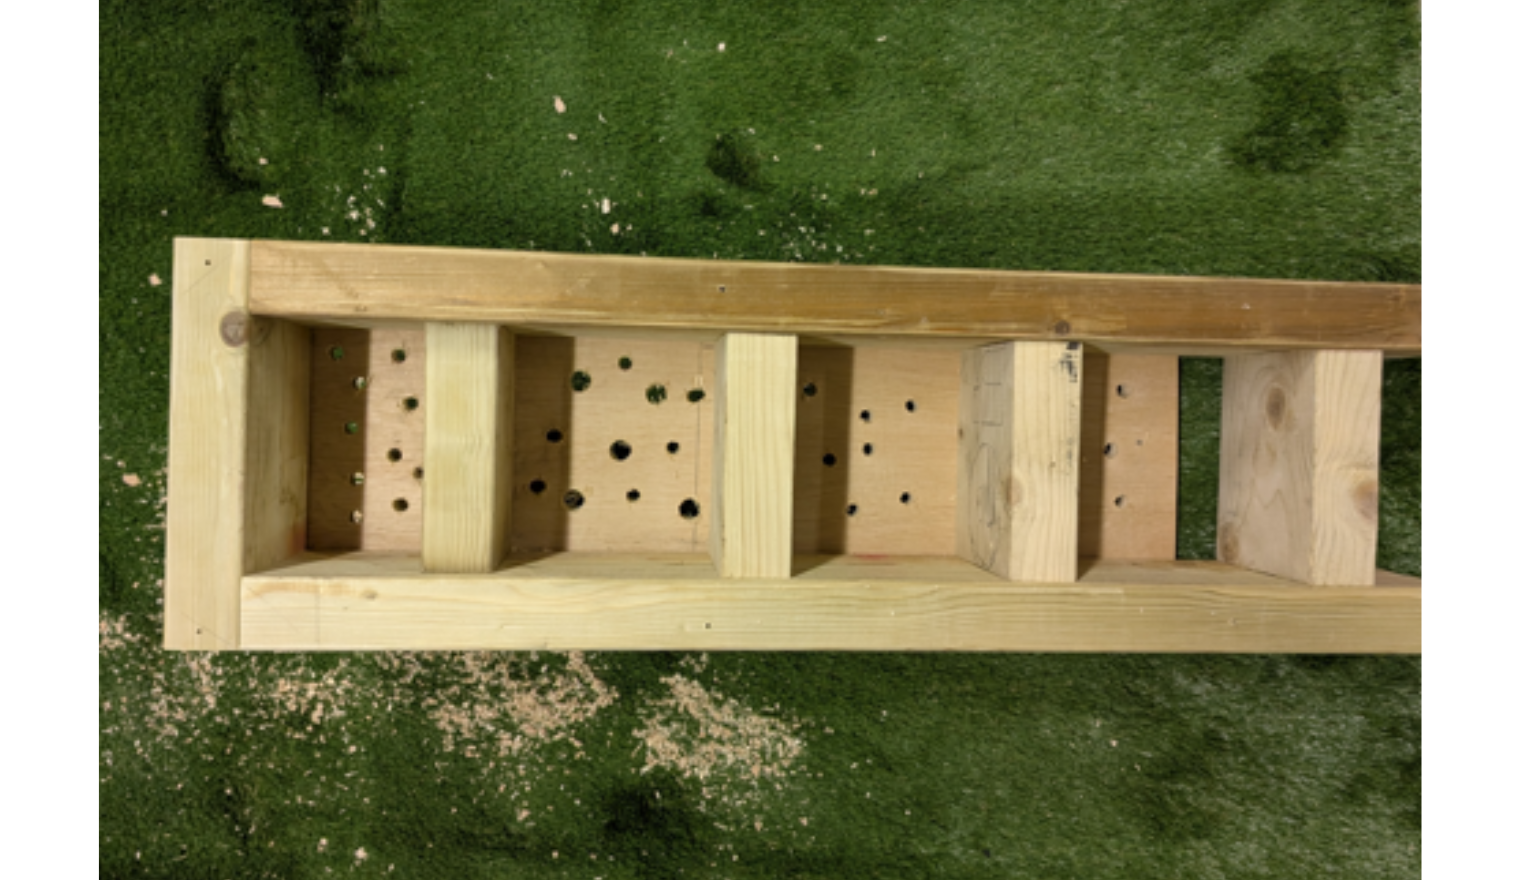
7. Drill holes into the back
Like I said, a back piece is optional, but ideal for creating more security and warmth for bees. On my piece, I’ve created several randomly placed and differently sized holes: these aren’t really necessary unless you want to attract bees.
As I wasn’t sure which section I wanted to use for bees or, indeed, if I wanted to use this entire hotel for bees, I created holes in every section just in case. You can create as many of these as you want and put them wherever you choose – it’s completely up to you!
8. Get Creative!
With any luck, you’ve now created your first hotel, and it’s all been screwed securely together and looks something like my one above.
Great! Now’s your chance to involve the family and get super-creative by building different-sized structures, painting them different colours and patterns, and then filling them with all the material you’ve gathered.
As my intention is to create an insect city, I decided to paint the external parts of this first hotel, using some garden paint (Cuprinol Shades is an excellent choice). This will help create some colour across all my buildings, but, of course, isn’t necessary for the insects!
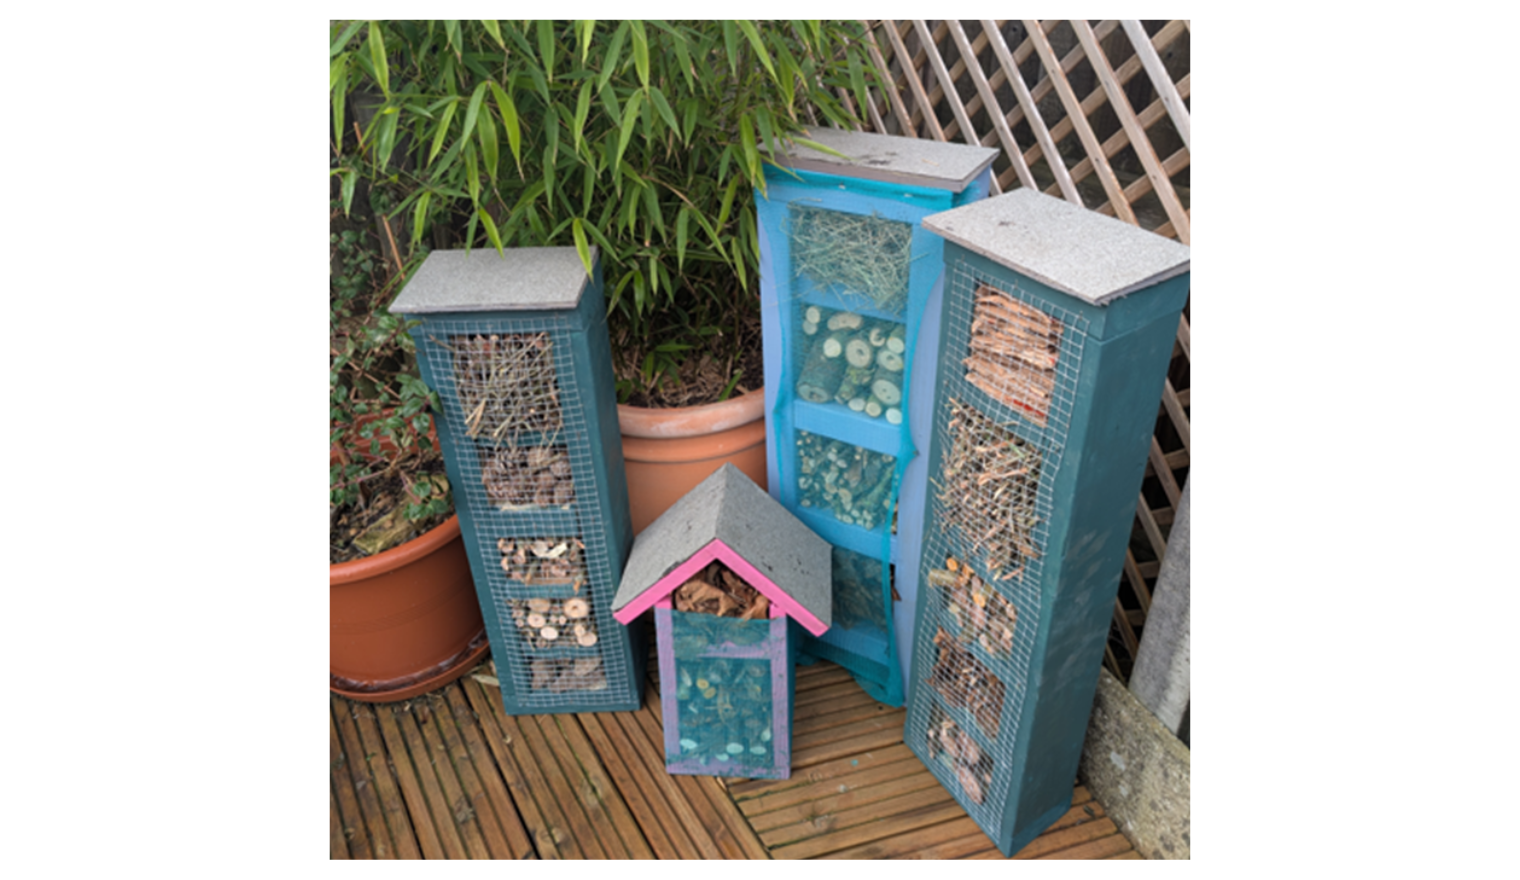
Here’s my initial four buildings for my ever-growing insect city:
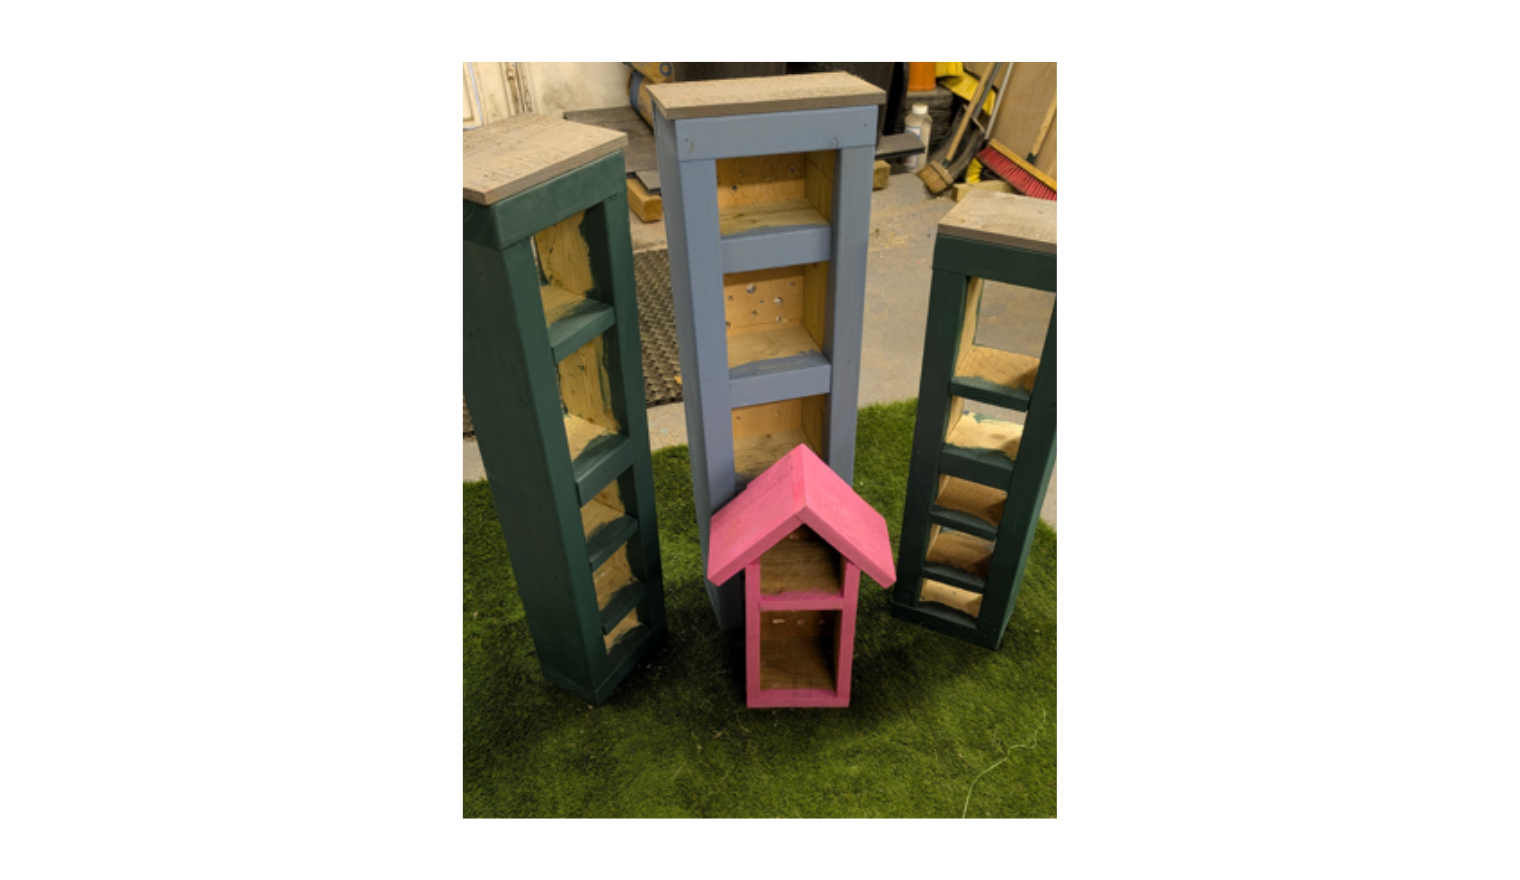
You’ll notice the two hotels painted sage don’t have a back. You can do whatever you like in terms of design as long as your structure is solidly built, won’t fall over, and creates dry areas for the insects and bugs.
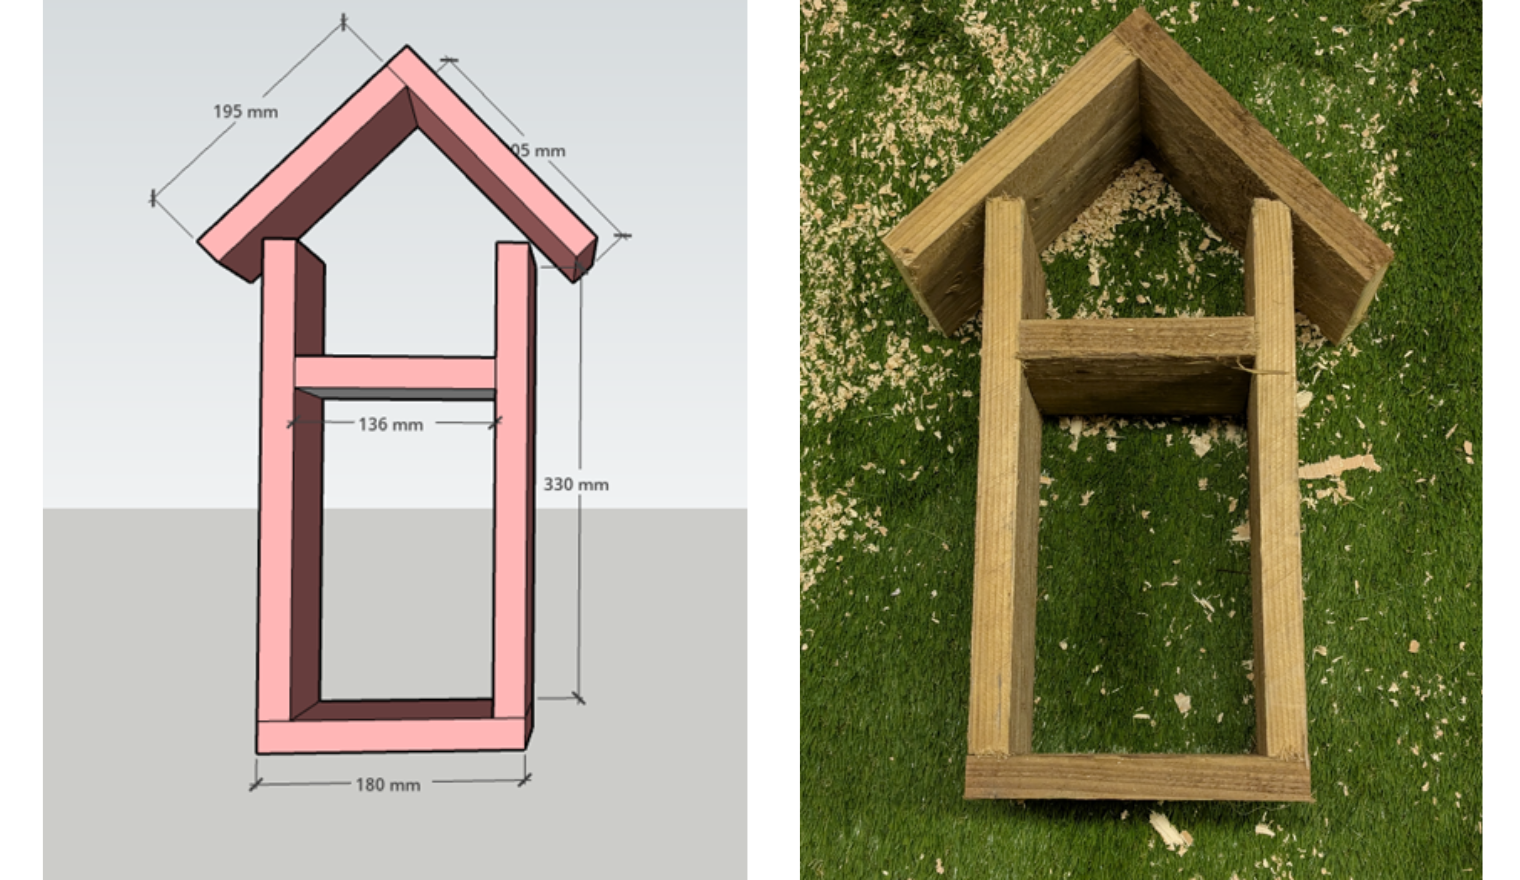
In the photo above, you can also see I created a smaller one in the style of a house. This was made from gravel board and was super-easy to construct. These are the measurements I used to create this house:
9. Create a barrier
Any barrier needs to allow bugs to access the structure and is only really there to prevent the materials inside from falling out or coming loose during bad weather.
I found some old fencing wire (such as chicken wire), which I cut down using a pair of pliers and then stapled to the rear of these two hotels. Alternatively, garden mesh or hessian sacks would also both be suitable to create a rear or even front barrier.
10. Fixing the bug hotel to the ground
You’ll also see that my hotel structures are quite tall and thin, which is absolutely fine in my garden: they are on a hard surface and in a sheltered position. However, if I just placed them on grass or soil elsewhere, they’d soon be blown over.
If you are also creating slim structures, I’d suggest using 2”x2” timber and knocking this down into the ground much like a tent peg. However, you should leave enough length exposed to go at least halfway up each hotel and then screw this peg to the rear of each.
Depending on how sodden your ground gets, these pegs may need to be knocked down 30-45cm to allow for a stable, long-term fixing.
11. Add a Roof
Lastly, I also found a few offcuts of shed felt which I trimmed to size on each structure and then glued into place. This will help keep the rain off.
It’s time to fill your slots with material and position them securely in place. If you want to attract bees, then as well as drilling holes in the rear of the bughouse, you should also drill holes in the wood you use. These holes need to be large enough to allow bees to enter comfortably. My hole sizes range from 8mm through to 14mm on both the rear piece and the branches in the photo.
Now you are all finished and can leave your hotel for the bugs and insects to check in!
When attempting to create this project, please ensure you use appropriate safety equipment.
If you are under the age of 18, please ensure you have an adult or guardian over the age of 18 present.
If you have any comments, ideas, or suggestions about this article please contact us at [email protected]
Please don’t forget to leave feedback on this article by clicking the tab to the right of the page!
Roger Merritt, Project Manager
Rachel Carluke, Family Information Officer
First published: March 2025
Review due: March 2026
